Thanks to Leonie for this blog entry.. I asked her if I held the scallop edge for her could I copy and past her blog entry.. and that is what I have done... heheh.. Thanks love!!!
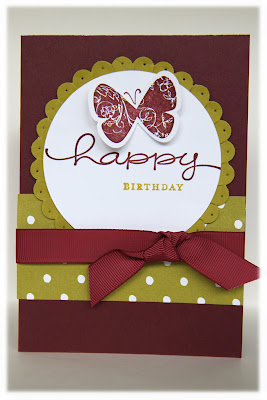
At our February Paper Angels Meeting we made this Beautiful Birthday Card featuring Butterfly Prints from the Summer Mini.
At our February Paper Angels Meeting we made this Beautiful Birthday Card featuring Butterfly Prints from the Summer Mini.

Stamps: Butterfly Prints (Summer Mini), Happy Everything
Ink: Bravo Burgundy, Kiwi Kiss
Card: Bravo Burgundy, Kiwi Kiss, Whisper White, Bella Rose DS
Accessories: Bravo Burgundy Grosgrain Ribbon
Tools: Circle Scissors Plus (summer Mini), Scallop Edge Punch, Paper Snips, Butterfly Punch (summer mini), Stamp-a-majig, Piercer, Adhesives.
Don't you love the scallop edge created around the large circle? Wondering how you can do this? I've put together some photos and instructions for you below.
1. Punch a long strip (A4 long side) of Card with the Scallop Edge Punch
 4. Put Adhesive right around the outside edge of your circle (on the back) and slowly adhere your scallop edge around the circle.
I've also had a few questions about the Circle Scissors Plus, and whether it is difficult to use. I love it, and after Liz showing me how to use it at our meeting, I find it very easy to use (unlike other horrible circle cutters I've tried in the past!). The circle scissor is so quick and easy, and makes a simple layout look a bit more special.
I only wish I had the skills to create a video tutorial to show you how great the Circle Scissors Plus is. Lucky for me though, some other SU demonstrators have done just this and I am able to include this great tutorial for you to watch on YouTube. Click here.
The Circle Scissors Plus and Glass Mat are sold separately. You can see them on the last page of the Summer Mini.
Reminder... there are only 2 weeks left to stock up
on your Summer Mini favourites!


No comments:
Post a Comment