Tuesday 7 May 2013

Beautiful Creations made with LOVE


<a href="//www.pinterest.com/pin/create/button/?url=http%3A%2F%2Fwww.flickr.com%2Fphotos%2Fkentbrew%2F6851755809%2F&media=http%3A%2F%2Ffarm8.staticflickr.com%2F7027%2F6851755809_df5b2051c9_z.jpg&description=Next%20stop%3A%20Pinterest" data-pin-do="buttonPin" data-pin-config="above"><img src="//assets.pinterest.com/images/pidgets/pinit_fg_en_rect_gray_20.png" /></a> <!-- Please call pinit.js only once per page --> <script type="text/javascript" async src="//assets.pinterest.com/js/pinit.js"></script> Its always lovely to create something beautiful... but when you have an EXTRA special reason it is hard not to put your whole heart and soul into it!!!

This card was one of those projects for me!!! I made it for all the people who went to a fundraiser for our BEAUTIFUL Liz to sign... As she and her family had suffered a HUGE personal tragedy early on this year.... I really wanted it to be STUNNING just like her... To bring a smile to her face and to convey how much she really is loved... So with a little inspiration from the Lovely Monique's card that I received for my Birthday last year I was able to create this....

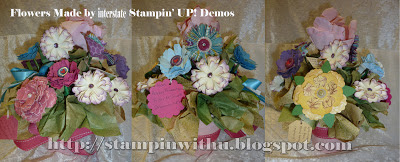
At the same time some BEAUTIFUL Stampin' Up! demonstrators from VIC... (not Paper Angels Members... but much loved too!!)  heard about the tragedy and wanted to do something to convey their love and support for Liz and her family too... they arranged to have each one of them make a paper flower and they sent them to me in the post then once I received them all I was able to arrange them in this lovely little arrangement for Liz to keep... What a special SPECIAL thing for them to do!!!
<a href="//www.pinterest.com/pin/create/button/?url=http%3A%2F%2Fwww.flickr.com%2Fphotos%2Fkentbrew%2F6851755809%2F&media=http%3A%2F%2Ffarm8.staticflickr.com%2F7027%2F6851755809_df5b2051c9_z.jpg&description=Next%20stop%3A%20Pinterest" data-pin-do="buttonPin" data-pin-config="above"><img src="//assets.pinterest.com/images/pidgets/pinit_fg_en_rect_gray_20.png" /></a> <!-- Please call pinit.js only once per page --> <script type="text/javascript" async src="//assets.pinterest.com/js/pinit.js"></script>

(I found another thing to do with that brown paper.. if you spritz it with some re-inker and alcohol you can colour it... it was great in this arrangement for the green filler...)

I hope and prey that these lovely paper craft items will bring many blessings to Liz and her family... and the love that went into creating them will fill her home!!!!

Punch Art Chalenge


One of my lovely friends comes to visit quite often and we sit and talk and sometimes craft etc the day away... She is an amazing Milinar (maker of hats etc) and if she comes with a project to do there is always a challenge in it for me...Recently she came with this lovely pirate paper she had found a while ago.. Suzie was in desperate need of some boys cards and what better says boys than a good old pirate theme??? My challenge...(*insert Mission Imposable theme music) If I choose to accept... was to design some Pirate themed punch art...


Skull and Crossbones

Then this cool palm tree....


Then this Parrot.... It took me FOREVER!!! not sure I will want to create this again.. but I am sure I may have a look on the net for someone else' to CASE... it's bound to be easier!!!

Arrrh maties.. I hope ye all ave a greeeeat time a punchin'!!!

BORBAL.... Christmas Decorations

How nice would it be to make your own Christmas decorations every year?... what a cool family time project to do!!!!I'm sure that making them would cost less then buying new ones every year!!! and you would get EXACTLY what you would want!!!

We made these three lovely different Ornaments last year in an Angel Ave class... It was great fun...


The red one is made with Over head transparencies.. or offcuts from laminating that didn't have a picture in them.. ( I went to Office works to get a few things laminated and asked them not to trim them neat... I trimmed them when I got home and kept the offcuts for such a project...)
HOW TO CREATE YOUR OWN
1.Cut out your desired shapes (flowers) with the Big Shot....
2.Spritz them all generously (If you mix your re-inkers with rubbing alcohol {I used Isicole} you can make a permanent paint solution that will stay on plastic... and you can add a little champagne shimmer paint if you like.... you will need to experiment with colours..  We found blue did not work as well... Not sure why it must be some kind of chemical science thing)
3.Dry them with the Heat tool... and get them quite hot so that you can shape them.. because they are plastic they will keep their shape... (and laminate is great for that)
4.Arrange them and join them together with a brad
5.Adhere a ribbon and card board circle peice for the hanfigin loop...
6.Finish off with a little glitter glue and you have a lovely new ornament to go on your tree...

The Black and white one was simply using a polystyrene ball, some pins and lots of lovely die cut snow flakes... I think this one is simply soooooooooooo Elegant!!! I's love a whole tree full of these!!!

And the last one is based on the lovely ornament that was on the front of the Sept 2012 - Jan 2013 Holiday Catalogue... I just loved it and had to make it....you need stamps, die cuts, silicone mat, hot glue gun, inks, ribbons and maybe some bling for this one...

The lovely Catherine made these ones...

My Hubbie's DA MAN

My Hubbie is AMAZING!!! He supports my hair brained ideas 110%... all the way.. He always takes an interest in my crafting... even though I am sure he must get bored with it sometimes...

I was a little upset with the fact that everyone kept talking about how hard I am to buy a present for... and Hubbie was quite perplexed as to what he would get me last year for my birthday... as money was tight and he knew I would like expensive things and he would be comfortable and excited to purchase something like a ipad or a new camera or something else techie.. (cause he does techie well)... Anyway one day I cracked it... I said a few stern words and told my whole family that I really wasn't that hard to please.. if they just all (mostly to the children) helped out around the house and cleaned up their messes and made me breckie in bed (on my Birthday) and maybe got to and made some of the things we had been talking about...  like a bedside table and a ribbon rack etc.. well that would be FANTASTIC.... (I had even gone out to IKEA with Master 13 and purchased an old door to attach legs to for a bedside table... and I had purchased from the hardware store some steal rods for the Mr to fix to a ribbon rack.. We had gone to a laser cutting place and gone through their bin of offcuts for the perspex... and I had even handed the materials {several times} to the perspective builders)..... I think the materials all up had cost under $10...

Long story short.. the next couple of weeks were really fantastic... I had a lovely Birthday... and Hubbie went the extra mile and made me this AMAZING +++ ribbon rack!!! I am so spoiled... :)
He even put the Stampin' Up! logo on it and the tag line is on the sides... Lucky me!!!!


I'm still waiting on the bed side table... but you know.. all things come to those who wait.. or go out and do themselves... (building the table is now on MY to do list)

Moral of the story is ... Ask and ye shall receive... 
and the other Moral to the story is... If at first you don't succeed... try try again... (sternly ;P)

Unisex Stamp n Stack

Man I love the Stamp n Stack.... and the One PAGE wonder is the BEST ever technique to teach beginners... and us oldies love it too.. I am forever using a one page wonder class... I NEVER grow tired of it!!! NEVER!!!

This colour combination is to die for too.. it is so non Jenda specific!!!! You could give any of these cards to a man or a WOman...heheh (WO.. cause we are WOnderful!!!! and we appreciate the WOrk that goes into cards and we WOuld cherish it!!) The colours are Gumball Green, Midnight Muse and Marina Mist..... YUMMMMIIIEEE!!!

Hope you like them too!!


Aqua Painting Flowers

In a Thursday class last year we made a lovely card... I taught my ladies how you can emboss with black and then colour with the ink pads and Aqua paint pens from the inside of the pads lid......
It's so cool how everyone had the same kind of things but came up with such different way to paint the flowers or to past them onto the cards.. I love creativity.. change my design as much as you like.... expand your imagination!!! and HAVE FUN!!!

Christmas Is a TIme for Cheer and FUN!!!

 Christmas really is a time for cheer and fun!!! So why not get in there and play a little!!!

I had a few classes with my lovely customers and some "play dates" with my lovely friends (and teammates who are my friends) and we came up with some fun gift tags and cards for the Season...

This little number is FUAN FUN FUN.. the ginger bread man looks as though he is peeking out from a window with all his friends.. soooo cute!!! and if you were in one of these classes as we were making it I had quite a few questions as to where to place the ribbon or the window of Ginger bread men... my answer simply was... "stick it where ever you like..." some people were offended... I'm not sure why??? hehehe (they weren't really.. they were just teasing me for my VERY CASUAL approach to teaching... we always have so much fun at Thursdays Card group!!!)


This CUTE idea of a decorated house was dreamed up by Michelle... we played for ages trying to work out how to make a card look like a decorated house...I'm sure we will perfect it some more in the future... You could make a whole village of houses if you want!!!


These Tags were inspired by someone.. I can't remember who... my memory is quite bad sometimes but at least I remember how to stamp etc... hehe.. I think we may have even done these at a Paper Angels meeting....?? does anyone else remember??? I know I ran a class on them after cause i loved them so much I thought others might like them too...


and finally these cute and easy stamp n stack cards with a Christmas theme...


It's oh so fun to play the day away....in a Stampin' Up! way.... Horaaaayyyyyy!!!!

Baby Brag Booklet

Have you ever wanted to give a LOVELY present and found that money was just too tight??? Well... my focus this year was making Christmas special and beautiful without the price tag...
 
This little baby Brag booklet was inspired by a Stampin' Up! instructional video I watched with a cool technique I used with an embossing folder, brayer adn ink pad...  (click for link Here) And would you believe that it may have only cost about $5 to $8 to make??? but if you are like me and already have all the card stock, stamps inks, embellishments and ribbon... well it costs nothing more than a little time... :)... that makes me very HAPPY!!!

I wanted the journaling to be hidden as I (like many) do not like my hand writing... I think it spoils the BEAUTIFUL page... sooooo the BEST solution is make a pocket and a tag to pull out with plenty of room to journal... so you will have the best of both worlds... personal hand written journaling that will not interfere with the page.... I do believe it is important to have some hand written things from our loved ones as it is a part of them... who they were when they have passed on... so please if you do feel like me and do not like your writing.. DON'T do all your journaling with the computer or symply just not journal at all... Write the story down... and do it in your own hand every now adn then... Your children and grand children (and so on) will be very grateful!!!


I hope this inspires you to make BEAUTIFUL handmade gifts... That cost only time and that capture a little of the "YOU" essence... (in creation and in hand writing... ;P )

Enjoy

Paper Angels Christmas Card Event 2012

Can you believe I did not post this???? I'm not sure how it got lost in amongst my posts...
Although it's been a few months since... Where has time gone???? I CAN still remember that we had a lovely time at the recent Paper Angels Mater Mother Bereavement fundraising events... As always...

We held six events in total and raised a total of around $4000 to go towards for filling our comment to the Angel Baby boxes and other Paper craft projects that we donate to local Brisbane Hospitals. Each year we are able to expand our reach with thanks to Stampin' Up for a generous donation boxes of FANTASTIC products to raffle off.... Also with thanks to ALL our WONDERFUL customers who love to come along, create, laugh and play with us and support the raffles!!!

As the year is going FAST!!! I expect it will not bee too long until we see you all at this years Paper Angels Christmas Card Event....

Mixed Media Art and Stamping

I love that you can use your stamps for so much more than "JUST STAMPING"!!!
Did you know that you can use fimo or scalpty (oven baked clay) to stamp into and use that as an embellishment on your projects??? We did it for this class...


The top left corner and bottom right corners are stamped with the ships log stamp from "The Open Sea" 123032 C Stamp Set and the inspirational greetings stamp... "Go confidently in the Direction of your Dreams" (from the Word Play stamp set -120651 C)
1. First you kneed the clay to make it nice and warm so that you do not have to push into the clay too hard...
2. You roll it out.. or flatten with hands etc ... to desired shape or size...
3. Then you stamp.... note.... you can use Versa Mark to coat the stamp if you like it prevents the clay sticking too much to your stamp.
4. Then you gently peal the clay away from stamp..
And there's your embellishment all ready to bake for 10- 15 mins in the oven... And you have a FANTASTIC original embellishment...

(I added a little something different to make the greeting words stand out a little more when I taught my ladies because I was not satisfied that the words were clear enough... I got them to coat the stamp in Gold pigment ink and that worked a treat.. and bakes in just fine...)

While we waited for the clay to cook we decorated the backing for the art work.. We took some old pieces of DSP (from the scrap draw) and tore it all up into strips... then we distressed it a little and glued it onto a card base to put in the frame... We then daubered some ink around it... (if you wanted to you could add some more stamping to the background... you could use some paint.. you could spritz... really the creativity options are endless...)

Also we took a length of  ribbon and used the re-inkers to dye it our desired colours... (This was an interesting experiment in its self.... it can get very messy!!! and... it can also not work out very well... The good thing to know though is you can always wash (Most) of the ink out and start again if you really don't like it...)

We then cut some of the ribbon in half.... and pulled some threads out to give the fringed look...

Once our clay was cooled we were able to adhere it to our backing with crystal effects...
We also use some broken pieces of jewellery and interesting bits and pieces to our art to add interest.. all bits were adhered with Crystal effects... (This is a great thing to do with that favorite earring that you only have one of or the broken jewellery you have stored in your jewellery box... While the Crystal Effects takes a little while to dry it holds really well and it is TOTALLY clear... )

We had loads of fun creating and playing... It was cool to see the individuality in each work of art...

Here's some of my ladies and their Mixed Media Art work...
The lovely Marj...


Beautiful little Miss Mia and Mummy's work of art... Michelle

Catherine and her awesome effort!!!

I hope you enjoy playing with lots of bits and pieces... Its fun to experiment!!!

Handcrafted by Ursula's Fan Box

Pinterest