Showing posts with label How to. Show all posts

Saturday, 25 August 2018

Clear Block and Ink Backgrounds


Your Clear Blocks can be used to put colour on so that you can come up with some awesome interesting backgrounds for your cards... here are just a few examples of using your blocks as a stamp to get and interesting look for your cards..

I put Tranquil Tide ink onto an F size block and then spritzed with water.. then I laid the Lemon Lime Twist Card mat onto the block allowing it to sit for a little while to soak up the water and the ink then I lifted it off and daubered around the edges to finish it off a little... 


With this one hear my Mat was actually White Card stock and I put both Tranquil Tide and Lemon Lime Twist ink onto the block then spritzed with water... let it run a little and then put the card stock on top of the block to soak up the ink and water...  I have found this to be a really cool way to get different effects for a relaxed looking background...


For this Lovely card I used a D sized Clear Block  and stamped teh block into the light blue and then rolled the edges into a darker blue and then spritzed...

Once i lifted up the card I noticed that there was a little more ink/water combo on the darker colour.. so i just blew it with a straw to get the splotch look...


It's so much fun to experiment with colours and arty techniques.. I hope you have fun experimenting too!!


Tuesday, 7 May 2013

BORBAL.... Christmas Decorations

How nice would it be to make your own Christmas decorations every year?... what a cool family time project to do!!!!I'm sure that making them would cost less then buying new ones every year!!! and you would get EXACTLY what you would want!!!

We made these three lovely different Ornaments last year in an Angel Ave class... It was great fun...


The red one is made with Over head transparencies.. or offcuts from laminating that didn't have a picture in them.. ( I went to Office works to get a few things laminated and asked them not to trim them neat... I trimmed them when I got home and kept the offcuts for such a project...)
HOW TO CREATE YOUR OWN
1.Cut out your desired shapes (flowers) with the Big Shot....
2.Spritz them all generously (If you mix your re-inkers with rubbing alcohol {I used Isicole} you can make a permanent paint solution that will stay on plastic... and you can add a little champagne shimmer paint if you like.... you will need to experiment with colours..  We found blue did not work as well... Not sure why it must be some kind of chemical science thing)
3.Dry them with the Heat tool... and get them quite hot so that you can shape them.. because they are plastic they will keep their shape... (and laminate is great for that)
4.Arrange them and join them together with a brad
5.Adhere a ribbon and card board circle peice for the hanfigin loop...
6.Finish off with a little glitter glue and you have a lovely new ornament to go on your tree...

The Black and white one was simply using a polystyrene ball, some pins and lots of lovely die cut snow flakes... I think this one is simply soooooooooooo Elegant!!! I's love a whole tree full of these!!!

And the last one is based on the lovely ornament that was on the front of the Sept 2012 - Jan 2013 Holiday Catalogue... I just loved it and had to make it....you need stamps, die cuts, silicone mat, hot glue gun, inks, ribbons and maybe some bling for this one...

The lovely Catherine made these ones...

Friday, 9 November 2012

Bleaching & INKS

I love Bleaching and inking... just take some plain old white card stock and make it whatever you desire!!!
Watercolour Paper and Reinkers Card

In a recent class I helped my ladies EXPLORE the wonders of reinkers with your card making....
We spritzed the paper down with a little water and then took some reinkers and placed one drop of each colour randomly over the paper.... then set it aside to dry... I LOVE the bold colours!!! It's such a cool FUN technique... and every time it is totally different!!!

Then we took a piece of A4 card stock to make a background for a scrapbook page.... Sometimes it is hard to find a masculine piece of DSP.... so again why not make your own...???

Spritz your paper with water again.. than take your aqua painter pen and dip it into some reinker ink and randomly squiggle on your page.... do some bleaching and some stamping and whalah you have a very cool individual MANLY page....

Reinker Painting & Stamping your own Designer Paper

I honestly think experimenting is the best!!! And I LOVE playing and getting messy with my ART!!! Who wants to grow up if you have to always obey rules??? I say Play the day away!!!

Happy Play time.. ENJOY your work!!!!!

Saturday, 28 May 2011

How to - Mount your Clear Stamps

For a little while I have been meaning to blog about what I do with my stamps because I believe it may help others....

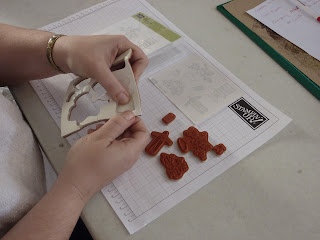
First of all I push out all the rubber die cut stamps.

Pop Them out

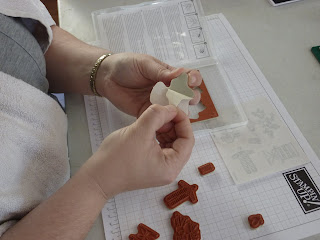
Then I peal the paper backing off the left over off cut.

Peal off Backing

And place it on the inside of the case for the set so that it sticks.

Place off cut inside you case

Next I take the paper off the rubber image.

Peel off backing on individual stamps

Then find the matching sticker image and peal off the paper..
(NB - Notice the split in the middle of the paper.. Stampin' UP ! Has left no detail for ease of use undone.... This is so that it is easier to peal off the paper.... And it will be on EVERY individual image)

Peal off Sticker Paper

 Be sure to take only the paper off and make sure that the sticky image stays in place...

Be Sure to leave Sticker on Paper

Next line up your rubber image with the outline of the sticky image and it should be PERFECT...

Place stamp over sticker lining up outside 

 Like this....

Place stamp over sticker lining up outside like this

Then you push down so it is stuck and peal off the sticky image with the now stuck rubber image.

Peal off Paper
And its Set

Once you have stuck each sticker on you can then place the stamp back in the off cuts inside the case.

Replace all stamps in off cuts in Case

 You will be amazed at how AWESOMELY it holds all your stamps in place...

And it will hold

Look they even stay there after turning the case upside down and shaking it!!!!

Even when upside down

I do this with EVERY set for a number of reasons..

1. Because they all stay in the case if I have not shut it properly. Especially the ones like Itty Bitty Sentiments that has what seems like HUNDREDS of little pieces...

2. When I pack up my stamp set after a workshop or a crafting session I can see at a quick glance that I have the WHOLE set in the case.... If I do find I am missing one it is not too late to go searching for it in the scrap bin or on the floor where it may have fallen....

3. Have you ever found that your individual stamps stick to the case sometimes and the sticker peals off??? Well I have found that when I do this they are held in by the rubber surrounds and not the sticker so the sticker does not stick to the case.. (unless you have pushed it down too hard last time you put them away) 

And

Lastly.... I sometimes have trouble remembering  which stamps belong to which sets.. So I find with this method.. If it doesn't fit... Well it just simply doesn't fit....

I hope this helps.... Happy Stamping
Love Ursula

Handcrafted by Ursula's Fan Box

Pinterest