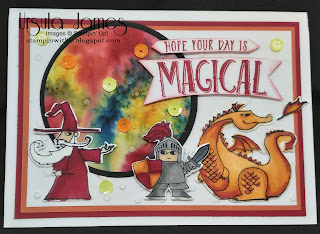
Friday, 27 July 2018

Unicorn Sticky Note


Who doesn't love a Unicorn?? but a Unicorn Sticky note ho9lder.. whooooaaa... so cool.. We made this lovely little number with the FANTASTIC (now retired :( ) Magical Moments stamp set... Using the unicorn image and stamping with StayzOn onto Silver card stock then Stamping it once more onto white card stock and dicutting out you can stick the white behind the silver and have a BEAUTIFUL colours main and tail!!!
The silver clouds behind are Silver Embossing Paste (145646 A$15.75) Sprinkled with Dazzling diamonds and chunky gold glitter while wet...
We also use a little magnet and a thin washer placed between the card stock and the DSP that lines the inside of the cover to have the cover seal when closed.


here is the same style in a different colour way.. I went a bit mental on the bling as it needed using up... but you get the idea...


And again using a tiny tiny magnet and a thin washer you can achieve the closing of the cover..


Wedding Cake Celebration


Have you ever wanted to make a lovely classy wedding cake card?? Well with these AMAZING products you can...
With the Cake Soiree Stamp Set & Sweet Cake Framelets It's super easy..

In these cards I used gold heat embossing powder to stamp teh images and then coloured with some ink taken from the inside of the ink pad lid and my Aqua Pinter Pen..

I love how detailed the serving tray is.. it looks so beautiful and elegant!!

And why not add a little extra bling with a string of sequins and some gold glimmer paper cut out with the bow shape in the framelets...


I added the greeting by cutting out a banner in black card stock and running it through the Big Shot with the Celebrate You Thinlets.. you can use the positive greeting or the negative...


Colour with Brusho - MAGIC!!!

Have you discovered the MAGIC of BRUSHO???

When we were introduced to it at the On Stage Event I knew I just had to get it!!! I love the random effect of colouring with it..  there are so many tutorials on the net for how to use it but what i have discovered is it is just through playing with it you learn what you can do... It is so much fun watching the colour magic happen right before your eyes... If you have not played with these wonderful colouring products you need to get onto it right away!!!


This was one of my first plays with Brusho... by embossing with white and then spritzing with water and sprinkling Brusho on you can come up with this BEAUTIFUL effect!! It is so easy.. just e sure not to sprinkle too much Brusho powder as a little goes A-LOOOOONGG Way!!!


Using just one colour you can make some fantastic backgrounds for sky or clouds.. this card was inspired by a pinterest post.. I just had to copy... Some people are just so clever!!


And then when you just want a really random ball of MAGIC COLOUR.. you can add all the colours to your pallet... to see how it turns out!!!


Have FUN getting your Brusho on!!!


Fridge Magnet Gift - Stampin Blends


For Easter this year I wanted to make a cute little card that could also be a gift .. cause this little retired sheep stamp is just too stinking cute to put in a draw or throw away... So I thought to myself.... "Self, if I make the little matt feature a bit that could come off and then be attached with magnets to the card you could take it off the card and put it on the fridge to keep FOREVER.. .... " Ohhhh these thoughts were so exciting!!!

And Whalah.. this is what I came up with for one of my community card classes.. It was such a success that I thought again that this could be a great swap for the April On Stage Stampin' Up! Event...  Of course you have to keep it with current product etc... so I got to BLENDING with my new Blends and oh my.. how I LOVE these!!!


I had a stack of these little mini treat boxes left form a class that I didn't quite get around to... so with inspiration from the lovely Rosa.... (one of my BEAUTIFUL team members) We came up with these little Ferrero Rocher
gift boxes... And because the decoration on the front of the box is also a little magnet it is a DOUBLE gift... Cool right?


I LOVE my BLENDS.... And now that we have MORE and MORE colours.. It is just so exciting!!!!

Of course a little kindi glitz doesn't go astray!!!

I was so sad when this BEAUTIFUL Magical Day Stamp set was not returning.. I do not think I got enough use out of it.. but it is definitely one that I will be keeping cause I LOVE it also!!!


Check out the mermaid from the Magical Day Stamp Set... I just love her too....


With all the fantastic colours you can do some really cool colour variations.. and use all kinds of shade of Kindi Glitz too.. heheh.. Love it!!! I had so much fun making these..


And just for a few more I though I could make some cupcake magnets... these I sprayed with some banana, vanilla and strawberry scent..


Then to finish it all off I made some Magical rainbows...  These were pretty cute too..

It is always fun to swap with other demos from all over.. and It is such a great way to meet new people... and to be inspired by their creativity!!!  I love it.. and if I have time I will always try to participate in them at all the Stampin' Up! Events I am able to attend!!

I hope you can come up with some of your own little "forever" gift magnets for your creations.. Just taking the gift of a card one step further...

Rocking Horse


This is a cute easy lay out that just adds a little oomph to your project.. you can use this with any style stamped image.. It's just fun...

The horse is coloured with re-inkers and an aqua painter pen...


 Here's your challenge... Using this template set out come up with your own design of cards..

Happy Layering!!!

Artful Techniques

Don't you just love experimenting?? It makes me so happy to be arty farty.. get messy and creative.. I have a saying that a truly creative person does not create in an organised space.. I don't know about you but when I start everything is lovely and clean.. but by the time I have finished a couple of hours of creating I have EVERYTHING out on the table and you can see that I have had a BLAST!!! Ive left my mark for sure!! So here a a few cards that I was experimenting with...


This first one is with water colour paper, aqua painters and re-inkers... just place a little reinker on a piece of acetate then pick up a little of that colour with your aqua painter and drop the colour onto your watercolour paper... Squeeze out the body of your aqua painter until the water is clean and then you can repeat this process with as many colours as you like..
 Then dry off with your heat tool and stamp an image or greeting over the top with Stayz On (or another colour ink you might like)


This card is called chalk board... So what you do here is stamp your image and your greeting in white craft in onto a dark coloured card stock.. (BLACK) and then using your watercolour pencils colour over the image to give it that professional chalk board artsy look...  Simple and EASY!!


This final card is shadowing.. using your die cuts cut out the shapes in acetate.. then using a dauber make your cutouts like a stencil.. and dauber the colour onto your card stock...

Then you can cut out the die cuts in coloured card stock and layer it over just a little off center to give you that cool effect...

I've also done a little spritzing with an aqua painter filled with Espresso re-inker and alcohol rub... take off the cap and then flick the brush to get fine little drips and splats of ink... This is a great technique for aging things.. and just adding a little more interest to your projects. 

Have fun playing..


PAPER MUG


I've been wanting to make a Treat Mug for ages... I was inspired by lovely friend (and SU Demo) who brought some show n tell to a girly sleep over craft night... I looked at hers and figured out how to do it.. and.... Then I had a class on Friday... My ladies LOVED it!!!
So much fun!!!
— with Joanne Stoddart and Jennifer Andersen.

Here's a PDF (Paper Mug Instruction) I created for them... Have fun Creating... xxoo


Using Scraps - Card Making


SCRAPS... Man I have HEAPS!!!.. So last year I made many of my classes FOCUS on Using up some scraps..

here is how I organise my scraps.... I have folders of coloured card stock... Scrap bits... and some retired colours... all in PVC envelopes sorted into individual colours and close ish colours...


 I have a 12' X 12' BOX FULL of scrap DSP... if it is less then a 6' the bits go in there... and sometimes it can be a real nightmare to find something you may like to use... so then I can do this to help more..


SO then If you want to be kind to your customers.. or save yourself a little bit of a head ache... you can further sort your scraps into colour PVC folders... this is an example of a folder that I sorted into pink and purples... It makes it MUCH easier to find a colour you may be looking for when you have gone to this extent.. But I must warn you.. this kind of thing is VERY time consuming... It takes forever!!! SO just do a little at a time.. otherwise your will have scrap sorting burn out!!!


Then you can easily pair your card stock with your DSP scraps to match...

Here's another sorted PVC folder I did ages ago... with neutral colours..

This sorting makes it super easy for you and your customers to make up a card that you have a sample of for them to copy... and they can choose their own.. And it REALLY is a HIT!!


Here are the example of the two cards that were made from these scrap colour combos...


The only limitation is ones imagination!!

GO forth and be TOTALLY creative!!

Oh and I have a scrap container of ribbon also.. everyone loves picking through that to see what ribbon they will use..

Here's some more SCRAPPY inspiration...


I hope these inspired you to use those scraps more..

Rocking Boat

Swirly Bird Stamp set, Swirly Scribbles Thinlets, Lift me up stamp set, Duet Banner Punch, Thoughtful Banner Stamp set
I love my Paper Crafty friends and how they share their ideas and inspirations with me.. You know as a teacher sometimes we need inspiration also...

So this BEAUTIFUL card was inspired by the lovely Joanne Stoddart... She baught some show n tell to my house when she came to visit last year... and this little card was just delightful... I loved it.. So of course I had to CASE it and SHARE it with everyone... 

The boat is on a little pendulim and it rocks back and forward.. It makes for a GREAT interactive card!!! 


Using the Swirly Bird Stamp set (141749 A$44).. and the Swirly Scribbles Thinlets (141497 A$45).. Oh and the clouds from Lift me up stamp set (142896 A$37) 
And GUESS What even though I made this card a long while ago.. EVERYGHING is still current!!! Yeah!!! 

oh yeah I forgot the Duet Banner Punch141483 A$31) and the Thoughtful Banner Stamp set... (141614 A$37)

Enjoy!! 

Back now - Tech difficulty SOLVED!!!

So it's been a while since I've posted here.. I've had technical problems and had been trying to solve them myself... but nothing was working.. I asked for help.. but it didn't help....  So I gave up for a little while.. then... to my surprise the other day when I signed onto blogger with the thought that I would just ditch the whole idea of ever blogging on here again... and I would start a new blog with a different service.. ....  I found that they have totally changed the way they do things... and it is MUCH easier!!! YEAH!!!!!

So here's to new beginnings... I had about 5 posts from last year in my DRAFTS so I will post them and then I will get onto posting some more current cards and classes... 

YEAH... I'm doing a HAPPY DANCE!!!
Looking forward to sharing more with you all!!!


Handcrafted by Ursula's Fan Box

Pinterest