Showing posts with label Home Decor. Show all posts

Friday, 21 July 2017

April 2017 Artful Angels Training

Our April meeting had a challenge .. I was to create a variety of craft items with the one stamp set...


This is what Rosa did... She made a beautiful gift box, gift bag and card... 


I was kind of cheating with my samples as I had had a few classes in April  so I double dutied.. by making my classes based on the one stamp set...


This is what I did with the Lift Me Up stamp set (142896 - $37) and Up & Away Die cuts... (142748 - $50)


And this is what I did with the Floral Phrases (141767 - $31) and Detailed Floral Thinlet Dies (141482-$49)


A couple of cards... A Chockie holder.. A Pop Up card.. a Napkin ring and a Survival box of goodies.. It's good to challenge yourself to do different things.. think outside the box.


Rosa had a stall at a retirement place and had made a few things to go sell on the day... She was kind enough to share her ideas with us..

These peg have retired DSP, Card stock or Washi tape on them with a magnet on the back side so you can use them as note holders on your fridge... COOL idea!! And packaged up so nicely!!!


And she made these two little boxes of chockies


This was one of the projects we did.. a cute little pop out card..

Pull the ribbon side and out pops the greeting and a space to put a little flat treat like a heart chockie or after dinner mint...

LOVING the new In-color Lemon Lime Twist it is such a GORGEOUS colour!!!
The technique on this card is double daubering.. dauber in a light colour first and then dauber in a slightly darker shade of similar colour. The outer edge of the white card here has lemon Lime Twist and Tranquil Tide.. Daubered..

The flower image has been inked up at first with Lemon Lime Twist and then with a Dauber you can add a little of the Tranquil tide to the stamp and then Stamp as you would normally -being sure to hole the image to the card stock a little longer than you normally would...


This was the 2nd project we did.. The lovely Rose Wonder Stamp Set (140697 -$47) and Rose Garden Thinlets (140619 - $54) ..

Using old XRays (or Acetate Sheets) you can cut out with the thinlets and make your very own masking sheets... We daubered with our ink to create the colour of the flower and leaves.. and then we stuck the matching card stock over the top a little off skew. We also used reinker and isicole in a Aqua Paint pen to add the splashes of ink... It's a nice distressing technique...

We decided on the stamp set for our July Fundraiser day... (Seaside Shore 141625) and we talked about possible projects to do...
I made this card on a getaway with a friend and just fell in love with the stamp set..
I took inspiration from picture of a card on page 122 (2017-18) Catty.. Star of Light .. I loved the daubering and thought I could do something like that with many colours to create an ocean look...


One of the projects we really want to do is to stamp on tiles... these were a few I had a play around with...


We are hoping to do this with tiles.. if we can find the right ones for the right price...  And of course use the Seaside Shore stamp set on the tiles..


I can't wait to do the projects... So much fun..

Wednesday, 24 May 2017

ANGEL BABIES - TREASURED Memories


I had a beautiful friend of mine bring her TREASURED memories of her two ANGEL BABIES .. their tiny tiny foot prints and hand prints.. they were on two little bits of pink and blue paper... not really very substantial... but treasured none the less.... She had them up on her fridge over the years and had received some judgmental comments about them... asking why she would want to display them... She mentioned to me one day at church that she took them down because she didn't want to offend anyone.... It hurt my heart to think that someones words would cause her such pain and cause her to feel she needed to "Hide" them. It was then that I knew we needed to make them look as BEAUTIFUL and treasured as they really are... SO I did this with them for her...
With the basic set out of Angel Baby Footprint Cards and Name Cards I was able to make these wonderful memories into a piece of art that no one will ever have anything but WONDERFUL things to say!!!
It is such an honor to be able to share what we can with others to bless their lives...

And Stampin' Up allows us to do it with ease and pizzazz!!!


Monday, 2 June 2014

Mixed Media Framed Art

Michelle's  Mixed Media Framed ArtMarj's Mixed Media Framed ArtCatherine's Mixed Media Framed Art

Did you know that you can use your stamps to stamp into Fimo or Sculpty clay?... (it's a clay that you can mold and shape, then bake in the oven for 15mins to set hard...) It's fantastic to play with and see what you can do... With these box frames we made the art backing by ripping DSP in strips and sticking it on a piece of card stock.  We stuck all the bits down with Crystal Effects... and coated anything we wanted to be lacquered with Crystal Effects as well... Then we stamped a greeting ("Go in the direction of your dreams") and put that in the center of the artwork...We used gold ink on the stamp to highlight the words.. (It stays there when you bake it.) We also used the ships log stamp from "The Open Sea" Stamp set to make the corners. We daubered the ships log corners with Shimmer paint to give it the antique look... We each made a face and decorated it with reinker died ribbon and we used several bits of metal pieces to decorate further.. I think the result is kind of a Steam Punk Aztec looking wall art masterpiece... This was a great class and shows that your stamps can be used for so many more things than Just Stamping!!!

My Digital Studio - Personalised Wall Art

Love is - 1st Corinthians 13

This piece of wall art I made for my lovely friend.. Her Hubbie was researching in the scriptures about LOVE and he recorded his discoveries and thoughts it on a piece of paper... It was set out something similar to this... Only in his own handwriting and in Pencil...
It was a lovely thing for us to find when we were going through some of his paperwork....
A beautiful message left to his family from beyond...
LOVE is what will get us all through this life!!! 

Tuesday, 29 April 2014

Watercolour and Bleach Stamping Canvas


I love Watercolouring and Bleaching.... But mixing them together is AMAZING!!!
This was an Angel Ave Class last year.. We took a large piece of Watercolour paper and our inks and Aqua painter pens... Once you have coloured your page you can then take some stamps and Bleach Stamp... Once it is dry you can then cover your canvas.... And to finish it off you can then get the matching coloured card stock and add some lovely little  embellishments on the canvas...


Here are the ladies pages. They chose their own colours & chose slightly different ways to paint them..

Robyn's Watercolour and BleachingCatherines Watercolour & BleachingMarj's Watercolour and Bleaching
And here is the finished paintings on the canvas....... Have a play it is FUN...


Robyn's finished Wall artCatherines Finished ArtMarj's Finished Art


Tuesday, 7 May 2013

Beautiful Creations made with LOVE


<a href="//www.pinterest.com/pin/create/button/?url=http%3A%2F%2Fwww.flickr.com%2Fphotos%2Fkentbrew%2F6851755809%2F&media=http%3A%2F%2Ffarm8.staticflickr.com%2F7027%2F6851755809_df5b2051c9_z.jpg&description=Next%20stop%3A%20Pinterest" data-pin-do="buttonPin" data-pin-config="above"><img src="//assets.pinterest.com/images/pidgets/pinit_fg_en_rect_gray_20.png" /></a> <!-- Please call pinit.js only once per page --> <script type="text/javascript" async src="//assets.pinterest.com/js/pinit.js"></script> Its always lovely to create something beautiful... but when you have an EXTRA special reason it is hard not to put your whole heart and soul into it!!!

This card was one of those projects for me!!! I made it for all the people who went to a fundraiser for our BEAUTIFUL Liz to sign... As she and her family had suffered a HUGE personal tragedy early on this year.... I really wanted it to be STUNNING just like her... To bring a smile to her face and to convey how much she really is loved... So with a little inspiration from the Lovely Monique's card that I received for my Birthday last year I was able to create this....

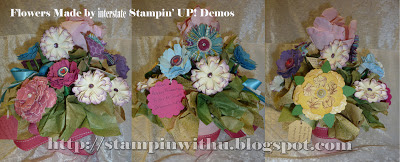
At the same time some BEAUTIFUL Stampin' Up! demonstrators from VIC... (not Paper Angels Members... but much loved too!!)  heard about the tragedy and wanted to do something to convey their love and support for Liz and her family too... they arranged to have each one of them make a paper flower and they sent them to me in the post then once I received them all I was able to arrange them in this lovely little arrangement for Liz to keep... What a special SPECIAL thing for them to do!!!
<a href="//www.pinterest.com/pin/create/button/?url=http%3A%2F%2Fwww.flickr.com%2Fphotos%2Fkentbrew%2F6851755809%2F&media=http%3A%2F%2Ffarm8.staticflickr.com%2F7027%2F6851755809_df5b2051c9_z.jpg&description=Next%20stop%3A%20Pinterest" data-pin-do="buttonPin" data-pin-config="above"><img src="//assets.pinterest.com/images/pidgets/pinit_fg_en_rect_gray_20.png" /></a> <!-- Please call pinit.js only once per page --> <script type="text/javascript" async src="//assets.pinterest.com/js/pinit.js"></script>

(I found another thing to do with that brown paper.. if you spritz it with some re-inker and alcohol you can colour it... it was great in this arrangement for the green filler...)

I hope and prey that these lovely paper craft items will bring many blessings to Liz and her family... and the love that went into creating them will fill her home!!!!

BORBAL.... Christmas Decorations

How nice would it be to make your own Christmas decorations every year?... what a cool family time project to do!!!!I'm sure that making them would cost less then buying new ones every year!!! and you would get EXACTLY what you would want!!!

We made these three lovely different Ornaments last year in an Angel Ave class... It was great fun...


The red one is made with Over head transparencies.. or offcuts from laminating that didn't have a picture in them.. ( I went to Office works to get a few things laminated and asked them not to trim them neat... I trimmed them when I got home and kept the offcuts for such a project...)
HOW TO CREATE YOUR OWN
1.Cut out your desired shapes (flowers) with the Big Shot....
2.Spritz them all generously (If you mix your re-inkers with rubbing alcohol {I used Isicole} you can make a permanent paint solution that will stay on plastic... and you can add a little champagne shimmer paint if you like.... you will need to experiment with colours..  We found blue did not work as well... Not sure why it must be some kind of chemical science thing)
3.Dry them with the Heat tool... and get them quite hot so that you can shape them.. because they are plastic they will keep their shape... (and laminate is great for that)
4.Arrange them and join them together with a brad
5.Adhere a ribbon and card board circle peice for the hanfigin loop...
6.Finish off with a little glitter glue and you have a lovely new ornament to go on your tree...

The Black and white one was simply using a polystyrene ball, some pins and lots of lovely die cut snow flakes... I think this one is simply soooooooooooo Elegant!!! I's love a whole tree full of these!!!

And the last one is based on the lovely ornament that was on the front of the Sept 2012 - Jan 2013 Holiday Catalogue... I just loved it and had to make it....you need stamps, die cuts, silicone mat, hot glue gun, inks, ribbons and maybe some bling for this one...

The lovely Catherine made these ones...

Mixed Media Art and Stamping

I love that you can use your stamps for so much more than "JUST STAMPING"!!!
Did you know that you can use fimo or scalpty (oven baked clay) to stamp into and use that as an embellishment on your projects??? We did it for this class...


The top left corner and bottom right corners are stamped with the ships log stamp from "The Open Sea" 123032 C Stamp Set and the inspirational greetings stamp... "Go confidently in the Direction of your Dreams" (from the Word Play stamp set -120651 C)
1. First you kneed the clay to make it nice and warm so that you do not have to push into the clay too hard...
2. You roll it out.. or flatten with hands etc ... to desired shape or size...
3. Then you stamp.... note.... you can use Versa Mark to coat the stamp if you like it prevents the clay sticking too much to your stamp.
4. Then you gently peal the clay away from stamp..
And there's your embellishment all ready to bake for 10- 15 mins in the oven... And you have a FANTASTIC original embellishment...

(I added a little something different to make the greeting words stand out a little more when I taught my ladies because I was not satisfied that the words were clear enough... I got them to coat the stamp in Gold pigment ink and that worked a treat.. and bakes in just fine...)

While we waited for the clay to cook we decorated the backing for the art work.. We took some old pieces of DSP (from the scrap draw) and tore it all up into strips... then we distressed it a little and glued it onto a card base to put in the frame... We then daubered some ink around it... (if you wanted to you could add some more stamping to the background... you could use some paint.. you could spritz... really the creativity options are endless...)

Also we took a length of  ribbon and used the re-inkers to dye it our desired colours... (This was an interesting experiment in its self.... it can get very messy!!! and... it can also not work out very well... The good thing to know though is you can always wash (Most) of the ink out and start again if you really don't like it...)

We then cut some of the ribbon in half.... and pulled some threads out to give the fringed look...

Once our clay was cooled we were able to adhere it to our backing with crystal effects...
We also use some broken pieces of jewellery and interesting bits and pieces to our art to add interest.. all bits were adhered with Crystal effects... (This is a great thing to do with that favorite earring that you only have one of or the broken jewellery you have stored in your jewellery box... While the Crystal Effects takes a little while to dry it holds really well and it is TOTALLY clear... )

We had loads of fun creating and playing... It was cool to see the individuality in each work of art...

Here's some of my ladies and their Mixed Media Art work...
The lovely Marj...


Beautiful little Miss Mia and Mummy's work of art... Michelle

Catherine and her awesome effort!!!

I hope you enjoy playing with lots of bits and pieces... Its fun to experiment!!!

Friday, 20 July 2012

Air Dry Clay Stamping

Air Dry Clay Embellishment

How cool is this???? a couple of months ago I went to Liz's place and she had been playing with some clay and stamping... One of her hostess had shown her some cool tags that she had been making....  I was so impressed I had to go out and get me some JOVI air dry clay... so I could play too!!! See how the creative FEVER spreads so fast and wide!!! How EXCITING!!!!

The clay for this tag has been coloured with our Stampin' UP! reinkers and then GENTLY pushed into the Elegant Lines Embossing folder... (the negative side) so that the swirly design is risen on top of the tag.... then it was cut out with a scallop cookie cutter, poked a little hole for the twine to go into and then left to dry for at least a day.... (You may need to turn it ever few hours to get it to stay flat.. cause it likes to curl up a little) Once it was dry I daubered it with the Frosty White Shimmer Paint and stuck a wonderful rhinestone on it... Now I have this LOVELY little jar to keep my sons weekly bus money in.. It's not very manly,.... but I figure it will deter him from going in there unless he absolutely has to... heheh.. so far it has worked!!!

Go get you some clay and have your very own to play with!!!! It's fun!!!


Saturday, 23 June 2012

Beau Chateau Pencil Case

I LOVE Stampin Up! Designer Fabric.. How BEAUTIFUL is it??? I always want to make something that is gorgeous and that will last with this material because of how stunning it is!!! So I got this fantastic idea... (which took me at least 3 months to put into action) when Kim came over with her beautiful daughter in the beginning of this year to make and design some custom made pencil cases for herself and some of her school friends...It's hard when you go to a school with strict uniform to individualize... and one way you can achieve this is to make your own accessories....

Beau Chateau Fabric is sooooooooooo feminine!!! I LOVE it!!! So with the idea of making myself a pencil case I went ahead and made me this one... I didn't want to use too much of the fabric so i recycled my old jeans and used them for the inside fabric... I also thought that they would be quite strong and give the pencil case a little extra strength... I lined the Beau Chateau Fabric with some felt... again to give it some strength...

Pencil Case Stampin Up Designer Fabric
Front of Pencil Case Stampin Up Designer Fabric

I made some lovely little bows and a little rose flower and hand sewed them on to decorate the outside.... I also used one of the lovely key charms from the last mini catalogue for an extra accent...

Inside the Pencil Case made from Stampin Up Designer FabricI made a big pocket to put all of the essentials in for when you travel with your kits or go to a class... as you can see it will fit in all your different adhesives tools and accessories....  just to make it extra feminine I added some lovely little decorative buttons and some more ribbon to the opening of the pocket...
The Lg Pocket of my Pencil Case - Stampin Up Designer Fabric


And because I wanted to make sure that I had enough room for HEAPS of pen's, pencils, craft knives, piercers, bone folders, Aqua Painter pens and so much more... I added heaps of little individual pockets to accommodate all of these and more!!!


The Pen Pocket in my Pencil Case - Stampin Up Designer Fabric
All in all I am quite happy with my lovely pencil case and I believe I have something really nice to keep for quite some time...

I hope this inspires you to see what else you can do with the Designer Fabrics....


Saturday, 3 December 2011

Southbank - Made with Love - Hand Crafted Classes 2011

Handmade Classes at Southbank Made with Love 2011

 This year I have be asked along with many other art and craft facilitators to be  involved in Made with Love, A South Bank Christmas this year, to promote the joy of handmade craft, giving and receiving.  What an honor it is to be  supporting such a great program! I am so looking forward to it... 

I had to submit quite a few projects to see what South Bank would like to have included in this program and here are pictures of my 'submitted projects'... Which if I blessed may be useful for next year when I am asked back!!! :)


We were asked to focus on recycled things... this first project is a lovely hair accessory... Using old denim jeans... of course it would be made with some of Stampin' UP's! new fabric  ... I just used some material I had on hand to put this one together.... 

Big Shot Flower Brooch or Hair accessory

Also we were asked to submit some ideas for younger children to participate in... or families... so I created this lovely Santa pouch gift box and a little gift card.... Punch art is always great for young and old.... This Santa was inspired by a picture I found on the internet... by typing in Punch Art Santa Stampin Up... and it's AMAZING just how many fantastically talented people there are who have designed so many different Punch are Santa's... I didn't make a not of this designer... (I am sorry i have not given proper credit... If I find you again I will make an effort to edit this blog entry...)

Santa Punch Art CardSanta Punch Art Pillow Box

To have a look at the workshops that are on offer and to purchase your ticket in this fantastic event please CLICK HERE ...... or the banner above.... 

The actual project I will be making is a lovely Bunting Banner which was totally inspired from our convention make n takes this year... I am sure it will be a hit...

This is the fantastic intro to my class... 

"Christmas Bunting Banners

Made With Love - Workshops | Tuesday 13 December 2pm–4pm, Wednesday 21 December 2pm–4pm, Friday 23 December 10am–12pm, Friday 23 December 2pm–4pm
Paper Christmas Bunting Banners with Ursula James
Stampin’ Up Independent Demonstrator, Ursula James will teach you how to make Christmas-themed bunting with die-cut words such as Noel. Made from card stock and paper craft accessories in colours good enough to eat."

I love the wording... "colours good enough to eat!!!!" How good is that??? and sooooooooo TRUE!!! 
This LINK takes you DIRECTLY to my class... I would love to see you there!!!!


Christmas Noel Bunting Banner

Love Ursula xxx

 This week I was sent a copy of some of the media coverage.. You are welcome to take a look and listen out for the radio advertising... I look forward to sharing this festive season with you and inspiring you to make your gifts this year....  xxx

"I have attached some fantastic recent press coverage of the program (Sunday Mail, B Mag, Style Magazine) as well as our radio ad, in case you haven’t already heard it on the air. The program is getting quite a lot of interest from the media, and we hope the excitement about the program will continue to grow, so we can encourage the people of Brisbane to slow down and rediscover the real meaning of gift-giving by indulging in some heartfelt generosity this Christmas at South Bank."


Handcrafted by Ursula's Fan Box

Pinterest